Как выровнять вид внизу экрана?

Вот мой код компоновки;

<?xml version="1.0" encoding="utf-8"?>
<LinearLayout xmlns:android="http://schemas.android.com/apk/res/android"
    android:orientation="vertical"
    android:layout_width="fill_parent"
    android:layout_height="fill_parent">

    <TextView android:text="@string/welcome"
        android:id="@+id/TextView"
        android:layout_width="fill_parent"
        android:layout_height="wrap_content">
    </TextView>

    <LinearLayout android:id="@+id/LinearLayout"
        android:orientation="horizontal"
        android:layout_width="wrap_content"
        android:layout_height="wrap_content"
        android:gravity="bottom">

            <EditText android:id="@+id/EditText"
                android:layout_width="fill_parent"
                android:layout_height="wrap_content">
            </EditText>

            <Button android:text="@string/label_submit_button"
                android:id="@+id/Button"
                android:layout_width="wrap_content"
                android:layout_height="wrap_content">
            </Button>

    </LinearLayout>

</LinearLayout>

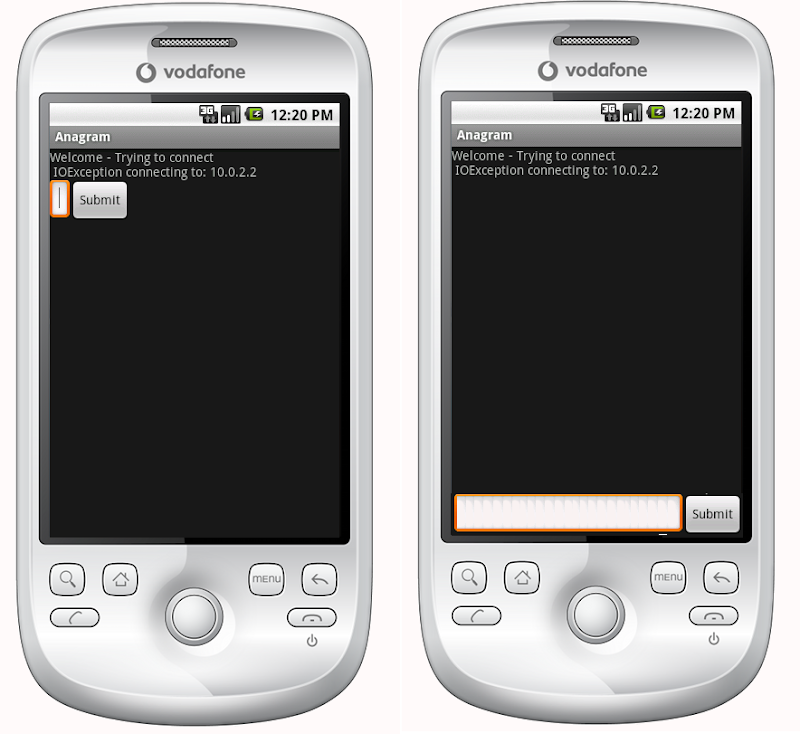
То, как это выглядит, находится слева, а то, как я хочу, чтобы оно выглядело, было справа.

Android Layout - Actual (Left) and Desired (Right)

Очевидный ответ - установить TextView на fill_parent по высоте, но это не оставляет места для кнопки или поля ввода.

По сути, проблема в том, что я хочу, чтобы кнопка отправки и текстовая запись были фиксированной высоты внизу, а текстовое представление заполняло оставшееся пространство. Аналогично, в горизонтальном линейном макете я хочу, чтобы кнопка отправки обернула свое содержимое, а текстовая запись заполнила оставшееся пространство.

Если первый элемент в линейном макете сообщается fill_parent, он делает именно это, не оставляя места для других элементов. Как получить элемент, который находится сначала в линейном макете, чтобы заполнить все пространство, кроме минимума, необходимого для остальных элементов в макете?


Относительные макеты действительно были ответом:

    <?xml version="1.0" encoding="utf-8"?>
    <RelativeLayout
    xmlns:android="http://schemas.android.com/apk/res/android"
    android:layout_width="fill_parent"
    android:layout_height="fill_parent">

    <TextView
        android:text="@string/welcome"
        android:id="@+id/TextView"
        android:layout_width="fill_parent"
        android:layout_height="wrap_content"
        android:layout_alignParentTop="true">
    </TextView>

    <RelativeLayout
        android:id="@+id/InnerRelativeLayout"
        android:layout_width="wrap_content"
        android:layout_height="wrap_content"
        android:layout_alignParentBottom="true" >

        <Button
            android:text="@string/label_submit_button"
            android:id="@+id/Button"
            android:layout_alignParentRight="true"
            android:layout_width="wrap_content"
            android:layout_height="wrap_content">
        </Button>

        <EditText
            android:id="@+id/EditText"
            android:layout_width="fill_parent"
            android:layout_toLeftOf="@id/Button"
            android:layout_height="wrap_content">
        </EditText>

    </RelativeLayout>

</RelativeLayout>

Ответ 1

Современный способ сделать это - использовать ConstraintLayout и ограничить нижнюю часть вида нижней частью ConstraintLayout с помощью app:layout_constraintBottom_toBottomOf="parent"

В приведенном ниже примере создается объект FloatingActionButton, который будет выровнен по концу и по нижней части экрана.

<android.support.constraint.ConstraintLayout
   xmlns:android="http://schemas.android.com/apk/res/android"
   xmlns:app="http://schemas.android.com/apk/res-auto"
   xmlns:tools="http://schemas.android.com/tools"
   android:layout_height="match_parent"
   android:layout_width="match_parent">

<android.support.design.widget.FloatingActionButton
    android:layout_height="wrap_content"
    android:layout_width="wrap_content"

    app:layout_constraintBottom_toBottomOf="parent"

    app:layout_constraintEnd_toEndOf="parent" />

</android.support.constraint.ConstraintLayout>

Для справки я сохраню свой старый ответ.

До введения ConstraintLayout ответом был относительный макет.


Если у вас есть относительный макет, который занимает весь экран, вы можете использовать android:layout_alignParentBottom, чтобы переместить кнопку в нижнюю часть экрана.

Если ваши виды внизу не отображаются в относительном макете, то, возможно, макет выше занимает все пространство. В этом случае вы можете поместить вид, который должен быть внизу, сначала в свой файл макета и расположить остальную часть макета над видами с помощью android:layout_above. Это позволяет нижнему виду занимать столько места, сколько ему нужно, а остальная часть макета может занимать всю остальную часть экрана.

Ответ 2

В ScrollView это не работает, так как RelativeLayout будет перекрывать все, что находится в ScrollView в нижней части страницы.

Я исправил его с помощью динамического растяжения FrameLayout:

<ScrollView 
    xmlns:android="http://schemas.android.com/apk/res/android"
    android:layout_height="match_parent" 
    android:layout_width="match_parent"
    android:fillViewport="true">
    <LinearLayout 
        android:id="@+id/LinearLayout01"
        android:layout_width="match_parent" 
        android:layout_height="match_parent"
        xmlns:android="http://schemas.android.com/apk/res/android"
        android:orientation="vertical">

                <!-- content goes here -->

                <!-- stretching frame layout, using layout_weight -->
        <FrameLayout
            android:layout_width="match_parent" 
            android:layout_height="0dp"
            android:layout_weight="1">
        </FrameLayout>

                <!-- content fixated to the bottom of the screen -->
        <LinearLayout 
            android:layout_width="match_parent" 
            android:layout_height="wrap_content"
            android:orientation="horizontal">
                                   <!-- your bottom content -->
        </LinearLayout>
    </LinearLayout>
</ScrollView>

Ответ 3

Вы можете сохранить свой первоначальный линейный макет, вставив относительный макет в линейный макет:

<LinearLayout
    android:orientation="vertical"
    android:layout_width="fill_parent"
    android:layout_height="fill_parent">

    <TextView android:text="welcome" 
        android:id="@+id/TextView" 
        android:layout_width="fill_parent" 
        android:layout_height="wrap_content">
    </TextView>

    <RelativeLayout
        android:layout_width="match_parent"
        android:layout_height="match_parent">
        <Button android:text="submit" 
            android:id="@+id/Button" 
            android:layout_width="wrap_content" 
            android:layout_height="wrap_content"
            android:layout_alignParentBottom="true"
            android:layout_alignParentRight="true">
        </Button>
        <EditText android:id="@+id/EditText" 
            android:layout_width="match_parent" 
            android:layout_height="wrap_content"
            android:layout_toLeftOf="@id/Button"
            android:layout_alignParentBottom="true">
        </EditText>
    </RelativeLayout>
</LinearLayout>

Ответ 4

Ответ выше (по Janusz) вполне корректен, но я лично не чувствую себя на 100% совместимым с RelativeLayouts, поэтому предпочитаю вводить "filler", пустой TextView, например:

<!-- filler -->
<TextView android:layout_height="0dip" 
          android:layout_width="fill_parent"
          android:layout_weight="1" />

перед элементом, который должен находиться в нижней части экрана.

Ответ 5

Вы также можете сделать это с помощью LinearLayout или ScrollView. Иногда это легче реализовать, чем RelativeLayout. Единственное, что вам нужно сделать, это добавить следующий вид перед представлениями, которые вы хотите выровнять по нижней части экрана:

<View
    android:layout_width="wrap_content"
    android:layout_height="0dp"
    android:layout_weight="1" />

Это создает пустое представление, заполняя пустое пространство и перемещая следующие представления в нижнюю часть экрана.

Ответ 6

Это также работает.

<LinearLayout 
    android:id="@+id/linearLayout4"
    android:layout_width="wrap_content"
    android:layout_height="fill_parent"
    android:layout_below="@+id/linearLayout3"
    android:layout_centerHorizontal="true"
    android:orientation="horizontal" 
    android:gravity="bottom"
    android:layout_alignParentBottom="true"
    android:layout_marginTop="20dp"
>

    <Button
        android:id="@+id/button1"
        android:layout_width="wrap_content"
        android:layout_height="wrap_content"
        android:text="Button" 

    />

    <Button
        android:id="@+id/button2"
        android:layout_width="wrap_content"
        android:layout_height="wrap_content"
        android:text="Button" 


    />

</LinearLayout>

gravity="bottom" to float LinearLayout elements to bottom

Ответ 7

1. Используйте ConstraintLayout в корневом макете

И установите app:layout_constraintBottom_toBottomOf="parent", чтобы расположить макет в нижней части экрана:

<LinearLayout
    android:id="@+id/LinearLayout"
    android:layout_width="match_parent"
    android:layout_height="wrap_content"
    android:orientation="horizontal"
    app:layout_constraintBottom_toBottomOf="parent">
</LinearLayout>

2. Используйте FrameLayout в корневом макете

Просто установите android:layout_gravity="bottom" в макете

<LinearLayout
    android:id="@+id/LinearLayout"
    android:layout_width="match_parent"
    android:layout_height="wrap_content"
    android:layout_gravity="bottom"
    android:orientation="horizontal">
</LinearLayout>

3. Используйте LinearLayout в корневом макете (android:orientation="vertical")

(1) Установите макет android:layout_weight="1" в верхней части макета

<TextView
    android:id="@+id/TextView"
    android:layout_width="match_parent"
    android:layout_height="0dp"
    android:layout_weight="1"
    android:text="welcome" />

(2) Установите дочерний элемент LinearLayout для android:layout_width="match_parent" android:layout_height="match_parent" android:gravity="bottom"

Основным атрибутом является ndroid:gravity="bottom", пусть дочерний View находится внизу Layout.

<LinearLayout
    android:id="@+id/LinearLayout"
    android:layout_width="match_parent"
    android:layout_height="match_parent"
    android:gravity="bottom"
    android:orientation="horizontal">
</LinearLayout>

4. Используйте RelativeLayout в корневом макете

И установите android:layout_alignParentBottom="true", чтобы раскладка располагалась внизу экрана

<LinearLayout
    android:id="@+id/LinearLayout"
    android:layout_width="match_parent"
    android:layout_height="wrap_content"
    android:layout_alignParentBottom="true"
    android:orientation="horizontal">
</LinearLayout>

Выход

Enter image description here

Ответ 8

Следуя элегантному решению Тимора, я обнаружил, что следующее создает вертикальную заливку в вертикальной LinearLayout и горизонтальную заливку в горизонтальной LinearLayout:

<Space
    android:layout_width="match_parent"
    android:layout_height="match_parent"
    android:layout_weight="1" />

Ответ 9

Вам даже не нужно вставлять второй макет relative внутри первого. Просто используйте android:layout_alignParentBottom="true" в Button и EditText.

Ответ 10

Если вы не хотите делать много изменений, вы можете просто поставить:

android:layout_weight="1"

для TextView с ID как @+id/TextView i.e

<TextView android:text="@string/welcome" 
    android:id="@+id/TextView" 
    android:layout_width="fill_parent" 
    android:layout_height="wrap_content"
    android:layout_weight="1">
</TextView>

Ответ 11

Создание верхнего и нижнего колонтитула, вот пример:

Макет XML

<RelativeLayout
    xmlns:android="http://schemas.android.com/apk/res/android"
    xmlns:tools="http://schemas.android.com/tools"
    android:layout_width="fill_parent"
    android:layout_height="fill_parent"
    android:background="@color/backgroundcolor"
    tools:context=".MainActivity">

    <RelativeLayout
        android:layout_width="fill_parent"
        android:layout_height="40dp"
        android:background="#FF0000">
    </RelativeLayout>

    <RelativeLayout
        android:layout_width="fill_parent"
        android:layout_height="40dp"
        android:layout_alignParentBottom="true"
        android:background="#FFFF00">
    </RelativeLayout>

</RelativeLayout>

Скриншот

Enter image description here

Ответ 12

Используйте приведенный ниже код. Совместите кнопку с кнопкой. Это работает.

<?xml version="1.0" encoding="utf-8"?>
<LinearLayout xmlns:android="http://schemas.android.com/apk/res/android"
    android:layout_width="match_parent"
    android:layout_height="match_parent"
    android:orientation="vertical" >

    <Button
        android:id="@+id/btn_back"
        android:layout_width="100dp"
        android:layout_height="80dp"
        android:text="Back" />

    <TextView
        android:layout_width="match_parent"
        android:layout_height="0dp"
        android:layout_weight="0.97"
        android:gravity="center"
        android:text="Payment Page" />

    <LinearLayout
        android:layout_width="match_parent"
        android:layout_height="wrap_content" >

        <EditText
            android:layout_width="wrap_content"
            android:layout_height="wrap_content"
            android:layout_weight="1"/>

        <Button
            android:layout_width="wrap_content"
            android:layout_height="wrap_content"
            android:text="Submit"/>
    </LinearLayout>

</LinearLayout>

Ответ 13

Для такого случая всегда используйте RelativeLayouts. LinearLayout не предназначен для такого использования.

<?xml version="1.0" encoding="utf-8"?>
<RelativeLayout
    xmlns:android="http://schemas.android.com/apk/res/android"
    android:id="@+id/db1_root"
    android:layout_width="match_parent"
    android:layout_height="match_parent"
    android:orientation="vertical" >

    <LinearLayout
        android:layout_width="match_parent"
        android:layout_height="match_parent"
        android:orientation="vertical">

        <!-- Place your layout here -->

    </LinearLayout>

    <LinearLayout
        android:layout_width="match_parent"
        android:layout_height="wrap_content"
        android:layout_alignParentBottom="true"
        android:layout_gravity="bottom"
        android:orientation="horizontal"
        android:paddingLeft="20dp"
        android:paddingRight="20dp" >

        <Button
            android:id="@+id/setup_macroSavebtn"
            android:layout_width="0dp"
            android:layout_height="wrap_content"
            android:layout_weight="1"
            android:text="Save" />

        <Button
            android:id="@+id/setup_macroCancelbtn"
            android:layout_width="0dp"
            android:layout_height="wrap_content"
            android:layout_weight="1"
            android:text="Cancel" />

        </LinearLayout>

</RelativeLayout>

Ответ 14

Используйте android:layout_alignParentBottom="true" в <RelativeLayout>.

Это определенно поможет.

Ответ 15

Если у вас есть такая иерархия:

<ScrollView> 
  |-- <RelativeLayout> 
    |-- <LinearLayout>

Сначала примените android:fillViewport="true" к ScrollView, а затем примените android:layout_alignParentBottom="true" к LinearLayout.

Это сработало для меня отлично.

<ScrollView
    android:layout_height="match_parent"
    android:layout_width="match_parent"
    android:scrollbars="none"
    android:fillViewport="true">
    <RelativeLayout
        android:layout_width="match_parent"
        android:layout_height="wrap_content">
        <LinearLayout
            android:orientation="horizontal"
            android:layout_width="match_parent"
            android:layout_height="wrap_content"
            android:gravity="center"
            android:id="@+id/linearLayoutHorizontal"
            android:layout_alignParentBottom="true">
        </LinearLayout>
    </RelativeLayout>
</ScrollView>

Ответ 16

Вы можете просто дать вашему верхнему дочернему виду (TextView @+ id/TextView) атрибут:   android:layout_weight="1".

Это приведет к тому, что все остальные элементы будут внизу внизу.

Ответ 17

Я использовал решение, опубликованное Janusz, но я добавил отступы к последнему представлению, поскольку верхней частью моего макета был ScrollView.

ScrollView будет частично скрыт по мере роста с содержанием. Использование android:paddingBottom в последнем представлении помогает показать весь контент в ScrollView.

Ответ 18

Это также можно сделать с помощью линейного макета.

Просто укажите Height = 0dp и weight = 1 для макета выше и тот, который вы хотите внизу. Просто напишите высоту = оберните содержимое и не вес.

Он обеспечивает перенос содержимого для макета (тот, который содержит ваш текст редактирования и кнопку), а затем тот, который имеет вес, занимает остальную часть макета.

Я обнаружил это случайно.